Hi, I’m Adetunji Tiamiyu, Founder of Tialuxe Tech
I'm a
WordPress Expert
Shopify Developer
No-Code Builder
I design and develop high-performing websites and e-commerce stores with WordPress and Shopify. By blending no-code platforms with custom coding, I deliver tailored solutions that help businesses grow faster.

Consultation
Let’s discuss how your website can elevate your business. Book a free consultation today — no strings attached.
Services
Custom Web Development
Professional, responsive websites built on WordPress and no-code tools—tailored to your brand and designed to convert visitors into loyal customers.
E-commerce Solutions
High-performing online stores powered by WooCommerce and Shopify—optimized for sales, seamless checkout, and effortless management.
No-Code Mobile Apps
Engaging apps built with no-code platforms like Flutterflow and Adalo—delivering native and web solutions that scale with your business.
AI-Powered Solutions
Smart tools like chatbots, recommendations, and assistants—integrated to boost engagement, cut manual work, and drive smarter growth.
Custom Integrations & Automation
I connect your tools, platforms, and apps so they work together seamlessly—saving you time, reducing errors, and unlocking new possibilities for your business.
Website Care & Management
Ongoing updates, security, and performance monitoring—so your site stays secure, fast, and worry-free while you focus on growth.
My Portfolio
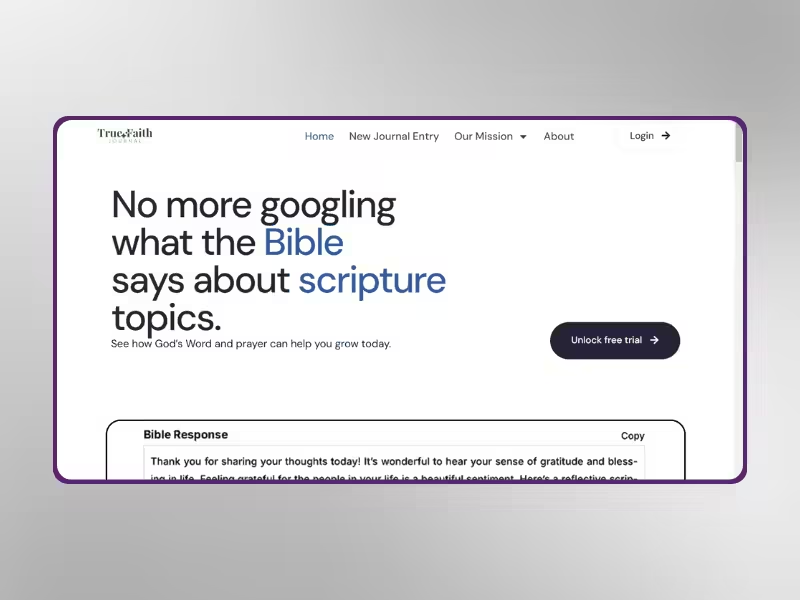
True Faith Journal: AI-Powered Scripture and Journal Platform
Built a dynamic, AI-driven Bible journaling platform with personalized user experiences and premium content.
- Client Calvin Flores
- Date July, 2024
- Service WordPress Website
- Budget $900+

Intro:
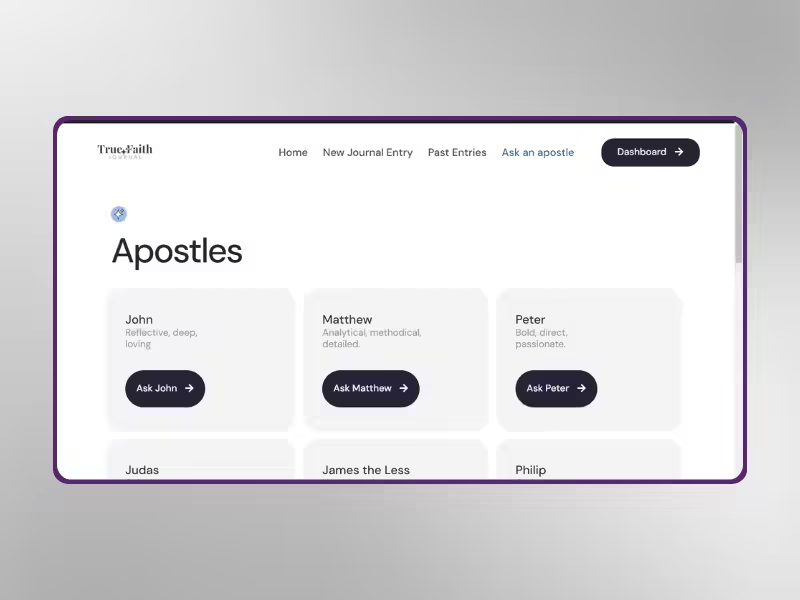
True Faith Journal (TFJ) is a faith-based website designed to offer users fast access to Bible scriptures and journals through AI technology. Calvin, the owner, was referred to me by Hudson, the owner of Elite Team AI, to create a platform that would cater to users of different spiritual needs. The main goal was to create a dynamic and engaging experience for users seeking to deepen their faith.
Solution:
I developed a feature-rich website using conditional logic to deliver unique experiences to three distinct user roles. From personalized menus to tailored homepage experiences, each user set is served dynamically. Premium users enjoy exclusive access to advanced features such as custom frontend posting, allowing them to log their Bible study entries. To ensure a smooth user experience, I implemented Google SSO, which simplifies the sign-up process.
The website is gated to restrict premium features to only paying users, ensuring an organized structure and improved monetization strategy for the platform.


Conclusion:
Building True Faith Journal was a rewarding experience, as it combined both advanced technical solutions and meaningful content delivery. The integration of AI and dynamic user experiences established TFJ as a unique platform for Bible study and faith journaling.
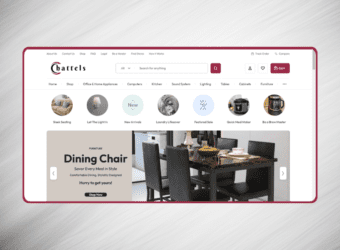
Chattels: Multi-Vendor Furniture and Appliances Platform
Developed a complex multi-vendor website for furniture and appliances with custom advanced features.
- Client Kunle Ojebode
- Date March, 2024
- Service WordPress Website
- Budget $200

Intro:
Chattels is a multi-vendor platform designed for the sale of furniture and household appliances. The goal was to create a feature-rich website that would enable multiple vendors to showcase their products efficiently. I was responsible for building this robust platform, incorporating advanced features for both vendors and customers to ensure a seamless user experience.
Solution:
To achieve this, I designed and implemented a dynamic multi-vendor system on WordPress. This included a robust mega menu to help users navigate the vast selection of products easily. I also integrated custom features tailored specifically for vendors, such as intuitive dashboards and product management tools. Due to the complexity of the platform, I utilized custom code to push beyond the limitations of WordPress and the plugins used, adding enhanced functionalities such as advanced search filters, inventory management, and automated vendor payout systems.
Additionally, I optimized the website’s performance to handle heavy traffic and large amounts of data, ensuring that both vendors and customers enjoy a smooth, reliable experience.


Conclusion:
Developing the Chattels platform was one of my most challenging yet rewarding projects. The combination of custom features, advanced vendor tools, and a highly functional website created a seamless experience for all users, firmly establishing Chattels as a go-to marketplace in the furniture and appliance space.
Custom Shopify Store for 5D Print Factory
Discover how I partnered with 5D Print Factory to create a feature-rich Shopify store with advanced functionalities for seamless shopping.
- Client Andres Daniel
- Date March, 2024
- Service Shopify Website
- Budget $1800

Intro:
5D Print Factory, owned by Daniel, is a thriving e-commerce business known for its success on Etsy. Daniel wanted to expand his business with a dedicated Shopify store, and I was tasked with building a feature-rich platform that complements his Etsy success. My goal was to create a fully functional e-commerce website tailored to his business needs.
Solution:
Using Shopify, I developed a customized store that went beyond the platform’s default capabilities by utilizing the Shopify Liquid language. This allowed me to create a unique and fully tailored experience, adding advanced functionalities that enhanced both the front-end user experience and back-end store management.
I implemented product categorization, an intuitive navigation system, and integrated payment options for a seamless shopping experience. The site is optimized for performance and user interaction, ensuring that customers can easily browse and purchase products. These enhancements made the store more dynamic, helping 5D Print Factory stand out in a competitive market.


Conclusion:
Building the Shopify store for 5D Print Factory was an enriching experience. The custom features and functionality I implemented not only met Daniel’s needs but also helped him scale his business beyond Etsy. The store continues to thrive, driving additional sales and growth for his brand.
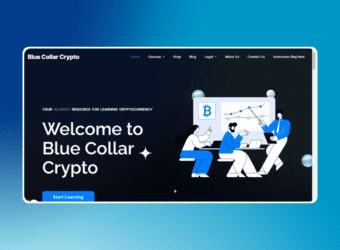
Blue Collar Crypto: Cryptocurrency Education and Merch Store
Built a feature-rich cryptocurrency platform with LMS and shop functionality.
- Client Phillip Simon
- Date July, 2023
- Service WordPress Website
- Budget $1200

Intro:
Blue Collar Crypto is a multifaceted platform that offers both educational resources on cryptocurrency and an online store for related merchandise. Phillip, the owner, reached out to me through Fiverr to develop a website that would cater to his vision of educating users while offering various features like an LMS, airdrop watch zone, and a shop for crypto-themed products.
Solution:
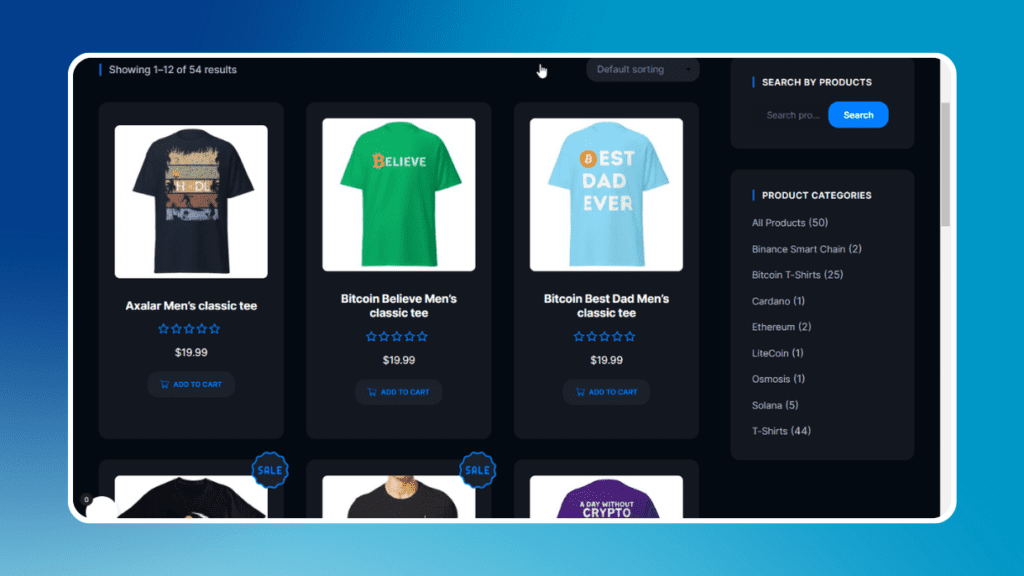
I developed the website using advanced custom post types (CPTs) and custom fields to implement multiple key features. These included a learning management system (LMS) for cryptocurrency education, a merchandise shop, and a unique airdrop watch zone where users could keep track of crypto airdrops. I also added a frontend posting feature to enhance user interaction, allowing members to contribute content directly.
Additionally, I optimized the site for performance and user experience, ensuring that the platform would be intuitive for both crypto novices and seasoned users.


Impact:
The website provided a comprehensive platform for cryptocurrency education, while also offering a seamless shopping experience. It enhanced user engagement with its diverse features, increasing traffic and providing Phillip with a scalable foundation to grow his brand.

Conclusion:
Building Blue Collar Crypto allowed me to integrate advanced functionalities into a cohesive platform that serves both educational and commercial purposes. The website continues to empower users with knowledge about cryptocurrency, while also providing a reliable space for purchasing related products.
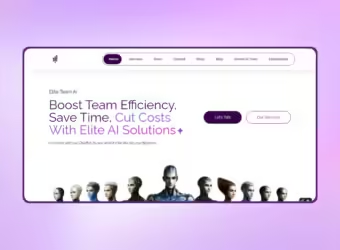
Elite Team AI: Gated Access and Seamless User Sign-On
Implemented premium access and Google Single Sign-On for Elite Team AI’s AI services platform.
- Client Hudson Wikoff
- Date May, 2024
- Service WordPress Website
- Budget $150

Intro:
Elite Team AI, owned by Hudson, offers a variety of AI models as services through its platform. Hudson approached me via Fiverr to restrict part of the website to premium users and improve the user registration experience. The goal was to provide exclusive access to premium content while ensuring a smooth sign-up process.
Solution:
I designed a secure, gated section of the website, allowing only premium users to access select AI models and services. To enhance user experience, I created a fresh, intuitive sign-up form that streamlined the registration process. Additionally, I integrated Google Single Sign-On (SSO) to simplify login for users, enabling them to sign up and access the gated content with their Google accounts effortlessly.
By implementing these features, I ensured that only authorized users could access premium content while making it easy for new members to join with minimal friction.


Conclusion:
The improvements to Elite Team AI’s platform, including gated access and Google SSO, helped enhance user experience and protect valuable premium content. These additions made the platform more efficient for Hudson’s business and positioned it as a reliable AI services provider.
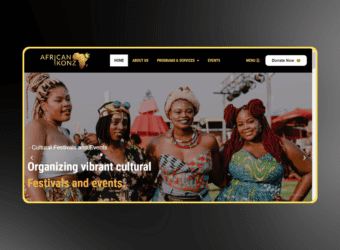
African Ikonz Charity Website: Celebrating African Heritage
Developed a website for African Ikonz, a charity empowering the African descent community.
- Client Michael Riat
- Date July, 2023
- Service WordPress Website
- Budget $150

Intro:
African Ikonz is a Canadian charity dedicated to fostering unity, cultural pride, and empowerment within the African descent community. Through various initiatives, the organization celebrates diversity and supports the well-being of its members. I was tasked with creating a website that would effectively communicate their mission, encourage involvement, and highlight their programs.
Solution:
I built the African Ikonz website using WordPress, focusing on an engaging and visually appealing design that reflects the organization’s cultural pride and unity. The site features sections that showcase their initiatives, volunteer opportunities, and ways to contribute. I implemented a donation system, making it easy for supporters to get involved.
Additionally, the site includes a blog to share stories and updates about their impact within the community. SEO optimization and mobile responsiveness were prioritized to ensure accessibility and visibility across all platforms.



Impact:
The new website enhanced African Ikonz’s ability to reach a wider audience, resulting in increased support through donations and volunteer engagement. The platform now serves as a central hub for empowering the African descent community and celebrating their cultural richness.
Conclusion:
Developing the website for African Ikonz has provided them with a professional online platform that supports their mission of empowerment and unity. It continues to drive community engagement, helping to create meaningful change for individuals of African descent in Canada.
My Journey
Freelance
Freelance Web & App Developer
Upwork & Fiverr PlatformsDesigned and delivered websites, e-commerce stores, and no-code apps for global clients. Specialized in WordPress, Shopify, and no-code platforms (Adalo, Flutterflow, Bubble). Built a proven record of high-quality delivery, repeat business, and strong client relationships across diverse industries.
Contract
Lead Web Developer at Chattels
ChattelsServing as the core technical developer for Chattels, a multi-vendor furniture and appliances platform. Responsible for custom coding, vendor tools, and complex integrations beyond native WordPress and Dokan capabilities—helping the platform scale into a robust marketplace.
Core Development Skill
WordPress Development
Shopify Development
HTML, CSS, JS, PHP
No-Code App Builders
Database Management
Complementary Skills
UI/UX Design
AI Prompt Engineering
API Integrations
Workflow Automation
Optimization & Security
Academic Knowledge
BEng - Mechatronics Engingineer
Federal University Of Oye-Ekiti, Ekiti StateEarned a Bachelor of Engineering degree with focus areas in control systems, programming, and automation. Developed strong problem-solving and teamwork abilities through hands-on projects and collaborative coursework.
Technical Knowledge
Web Development Internship
Oxford Computer College & Articulate Technologist ConceptCompleted intensive training across web development (HTML, CSS, JavaScript, PHP) and graphic design principles. These programs provided the dual foundation of technical and creative skills that continue to shape my work in modern web and app development.
Core Professional Skills
Communication
Problem-Solving
Attention to Detail
Time Management
Client Collaboration
Complementary Skills
Critical Thinking
Leadership
Creativity & Innovation
Continuous Learning
Adaptability to New Tech
Testimonial

Daniel Andres
ShopifyShopify Store
via Upwork - Feb 27, 2024Works well and over came some issues we had with the original plan but was able to pivot quickly to solve the problem. Good communication and is easy to get in contact with. I look forward to keep working with Adetunji!

Adekunle Ojebode
Woocommerce/AppMulti-Vendor Marketplace
via WhatsApp - Mar 24, 2024Tunji have been truly exceptional to work with. I will gladly recommend him to anyone looking for a top-notch developer like him.

Calvin Favors
WordPress/AppAI Powered Religious App
via WhatsApp - Aug 24, 2024Tialuxe Tech was crucial for our company in building a beautiful website for us in great time. He is a very nice human with an extensive skill set, and he was diligent in his work making sure we had plenty of interface updates. I would come to him again in a heartbeat for my next project. Highly recommend Tialuxe Tech, 10/10

Michael Rifaat
WordPressChurch Website
via Fiverr - Aug 18, 2023Working with Tialuxe Tech for the sixth time, and I think I've even lost counts. That's how good he's been. His communication skills are exceptional. I highly recommend him for their professionalism and expertise. Thank you for another successful project.

Hudson Wikoff
WordPressGating Feature (AI Website)
via Fiverr - Apr 10, 2024Another developer already built my website for me, but I needed a specific feature which is to add a paywall to some specific page and feature on my website. Luckily for me, I came across Tialuxe and he swiftly implemented a gating feature on my website. He's exceptional and communicates really well.

Phillip Simon
WordPressMulti-Features Crypto LMS
via Fiverr - Aug 16, 2023Met this guy on Fiver, and oh man, he's really good. I had built my website with Wix initially and he worked on that for me. He then offered me some amazing pro tips where he helped me rebuild a more better, more beautiful website with WordPress.
Awesome Clients
Blog
10 Ways a Website Can Benefit Your Business
In today's digital age, a strong online presence is essential

10 Ways a Website Can Benefit Your Business
In today’s digital age, a strong online presence is essential for businesses of all sizes. A well-designed website is not just a digital business card; it’s a powerful tool that can transform the way you operate and connect with customers. In this comprehensive guide, we’ll delve into the 10 ways a website can benefit your business, exploring each point in-depth to provide a thorough understanding of its importance in the modern business landscape.
1. 24/7 Accessibility
A website provides round-the-clock accessibility to your business. Whether it’s the middle of the night or a public holiday, potential customers can access information, make purchases, or contact you. This constant availability can lead to increased sales and customer satisfaction.
2. Expanded Reach
One of the most significant advantages of a website is its ability to transcend geographical boundaries. It empowers your business to reach a global audience, opening doors to new markets and customers you may have never reached otherwise. This expanded reach can fuel business growth and diversify your customer base.
3. Credibility and Trust
A professionally designed website enhances your business’s credibility and trustworthiness. It’s the digital face of your brand, where customers can learn about your products or services, read testimonials, and get a sense of your company’s values and ethos. A well-crafted website establishes trust, making visitors more likely to engage with your business.
4. Cost-Effective Marketing
Websites offer a cost-effective platform for marketing your business. Online marketing strategies, such as search engine optimization (SEO), content marketing, and social media promotion, allow you to reach and engage your target audience without incurring the high costs associated with traditional advertising. You can tailor your marketing efforts to fit your budget and see a substantial return on investment.
5. Data Collection and Analysis
Websites are powerful tools for collecting and analyzing valuable customer data. Through analytics tools, you can track user behavior, preferences, and demographics. This data is invaluable for making informed decisions, refining your products or services, and creating tailored marketing campaigns that resonate with your audience.
6. E-commerce Opportunities
For businesses in the retail sector, a website can serve as an additional sales channel. By setting up an online store, you can accept payments and reach a broader customer base. E-commerce capabilities provide convenience for your customers and can significantly boost your revenue.
7. Customer Support
Websites aren’t limited to selling products or services; they can also enhance customer support. Features like FAQs, live chat support, and contact forms create avenues for customers to seek assistance or have their questions answered promptly. Excellent customer support through your website can lead to higher customer satisfaction and loyalty.
8. Brand Consistency
Consistency is a fundamental aspect of branding. Your website enables you to control and maintain brand consistency in the digital realm. Through careful design and content management, you can ensure that your brand’s image, messaging, and user experience are aligned across all online touchpoints.
9. Competitive Advantage
In today’s competitive market, having a website is often expected by consumers. By having one, you can gain a competitive advantage over businesses that have not embraced the digital landscape. A well-optimized website can set you apart from the competition and attract more potential customers.
10. Scalability and Growth
Your website can evolve with your business. As you expand, you can add new features, expand your product line, and accommodate more visitors without significant structural changes. This scalability ensures that your website continues to support your growth and adapt to your changing needs.
Getting Started with Your Business Website
Now that you understand the numerous benefits of having a website for your business, it’s time to take action. Here are some steps to get you started:
1. Define Your Goals: Determine your website’s purpose, whether it’s to inform, sell, or provide support.
2. Choose a Domain: Select a memorable and relevant domain name that reflects your brand.
3. Design and Development: Hire a professional web designer and developer or use user-friendly platforms like WordPress, Wix, or Shopify to create your site. Speaking of expert, I’m one, and It take less effort from you to actually contact me. You can reach out to me through my email: contactme@tialuxetech.com, or via any of my social media link on the footer of this post, or you can as well quickly and easily direct message me via my WhatsApp, click here
4. Content Creation: Populate your website with engaging, informative, and SEO-optimized content that speaks to your target audience.
5. Marketing and Promotion: Utilize digital marketing strategies, including SEO, social media, and email marketing, to attract visitors to your website.
6. Regular Updates: Keep your website up to date with fresh content, new products or services, and additional features that enhance the user experience.
7. Analyze and Improve: Use analytics tools to monitor your website’s performance, identify areas for improvement, and make necessary changes to enhance user engagement and conversion rates.
In Conclusion
Your website is more than just a digital asset; it’s a vital component of your business strategy. It opens doors to new customers, enhances credibility, and offers cost-effective marketing opportunities. Embrace the digital era and harness the power of a well-crafted website to drive your business forward.
By implementing these 10 benefits, your website can become a dynamic tool for business growth, a source of trust and credibility, and a means to connect with a global audience. The time to create or enhance your business website is now; it’s a smart investment that can transform your business’s success in the digital age.
How to Display Different Sidebar for Each Post and Page in WordPress
[ad_1] Do you want to display different sidebars for certain

How to Display Different Sidebar for Each Post and Page in WordPress
[ad_1]
Do you want to display different sidebars for certain posts and pages on your WordPress site?
A lot of the time, you will want to show the same sidebar across your entire website or blog. However, sometimes you may need to show different sidebar content on some of your posts and pages.
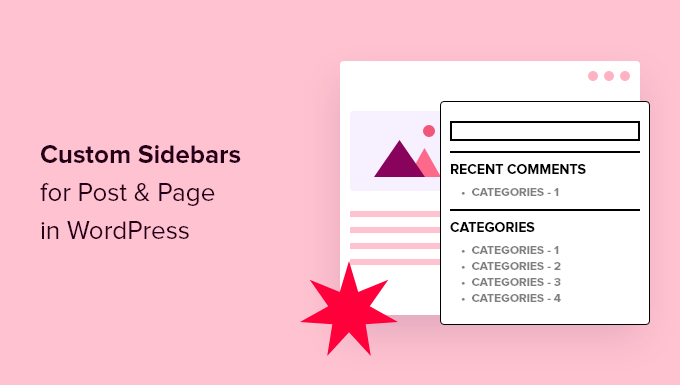
In this article, we will show you how to create and display different sidebars for each post and page in WordPress.
When Would You Need Different Sidebars in WordPress?
Many WordPress themes have a sidebar where you can add useful widgets and content. For example, many sites add a search bar to the sidebar or show a list of recent posts.
If your WordPress theme has a sidebar, then by default, it will look the same on all your posts, pages, categories, and archive pages.
However, you may want to display different sidebar widgets on certain posts and pages.
For example, you might show different content in the sidebar of your most popular posts or display ads that are more relevant to a particular page.
You could even use different contact forms depending on the page’s content.
Having said that, let’s see how to create and display a different sidebar for each post and page in WordPress. Simply use the quick links below to jump straight to the method you want to use:
Method 1: Displaying Different Sidebars for Each Post and Page in WordPress (Easy)
If your theme supports sidebar widgets, then you can easily create multiple sidebars using Lightweight Sidebar Manager. This plugin lets you build as many custom sidebars as you want and then assign them to different posts and pages. You can also add them to custom post types or assign a sidebar to all the pages or posts that have a specific category.
The first thing you need to do is install and activate the Lightweight Sidebar Manager plugin. For more details, see our step-by-step guide on how to install a WordPress plugin.
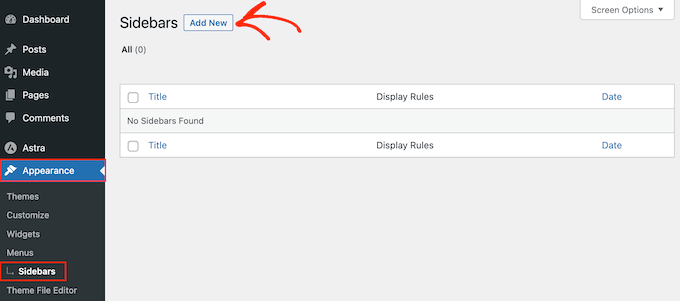
Upon activation, you need to go to Appearance » Sidebars. To create the first sidebar, click on the ‘Add New’ button.
You can now type in a title for the sidebar. This is just for your reference, so you can use anything you want.
With that done, open the ‘Sidebar To Replace’ dropdown menu and choose the location where you want to show the sidebar. The options you see may vary depending on your WordPress theme.

Now, you can control where the sidebar appears by creating inclusion or exclusion rules.
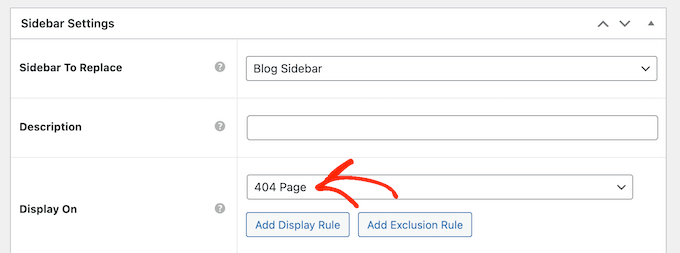
To create an inclusion rule, just open the ‘Display On’ dropdown and choose the pages, posts, custom post types, or categories where you want to use the sidebar.
For example, you might add the sidebar to a specific page, such as your 404 error page or the author archive.
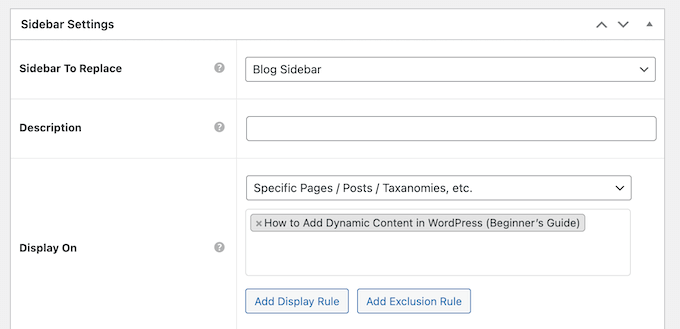
Another option is using the sidebar for a particular page, post, or category by selecting ‘Specific Pages/Posts/Taxonomies.’
This adds a box where you can type in the page, post, or category.
To create more inclusion rules, simply click on the ‘Add Display’ Rule button.
This adds a section where you can create the new inclusion rule.

If you prefer, then you can create exclusion rules instead. For example, you may want to show the sidebar on every page except the homepage.
You can also combine inclusion and exclusion rules to control exactly where the sidebar appears on your WordPress website.
To create an exclusion rule, just click on the ‘Add Exclusion Rule’ button.

In the new ‘Do Not Display On’ section, open the dropdown menu and select the page or post that shouldn’t use this sidebar.
You can also exclude the sidebar from pages that have a specific category by following the same process described above.
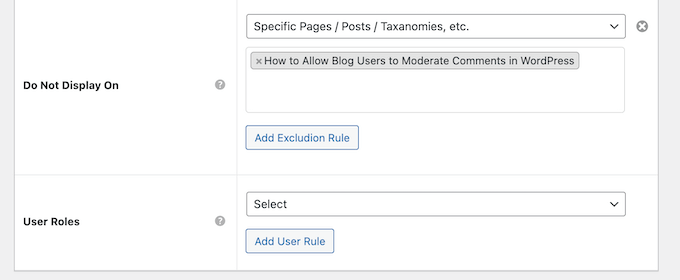
After deciding where the sidebar will appear on your WordPress blog, you may want to show different content to different users.
For example, if you have a membership site, then you might use a different sidebar for visitors compared to logged-in members.
To do this, open the ‘User’ dropdown and choose a role from the dropdown menu. Now, only people with this specific user role will see the sidebar.

Finally, you may want to type in an optional description. This will only appear in the WordPress dashboard, so it’s a good way to share information with other admins or users on a multi-author WordPress blog.
If you are going to create lots of sidebars, then you can also use this field to leave yourself notes and helpful reminders.
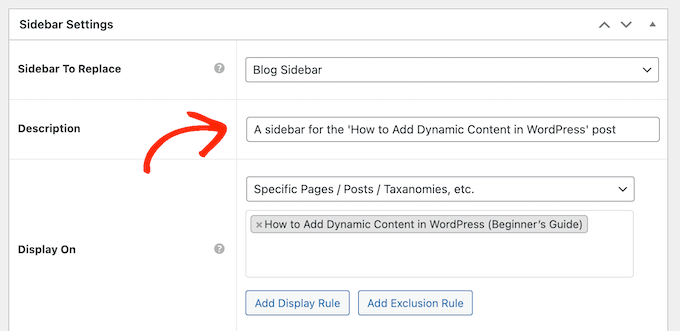
When you are happy with the information you have entered, simply click on ‘Publish.’
With that done, go to Appearance » Widgets. You will now see all the widget-ready areas that your theme supports by default, plus the new sidebar you created in the previous step.

You can now go ahead and add widgets to the sidebar, just like any other widget-ready area.
For step-by-step instructions, please see our guide on how to add and use widgets.
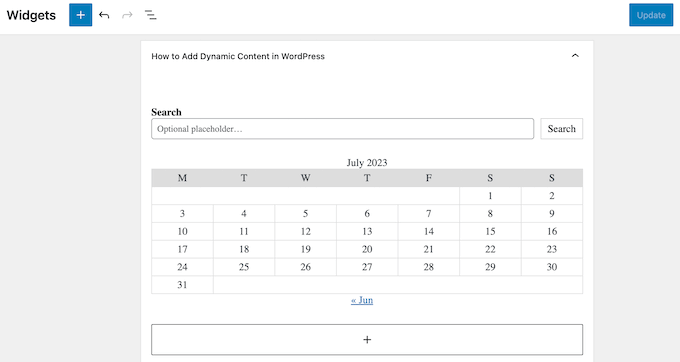
When you are happy with how the sidebar is set up, click on ‘Update.’
Now, if you visit your WordPress blog, you will see the new sidebar live.
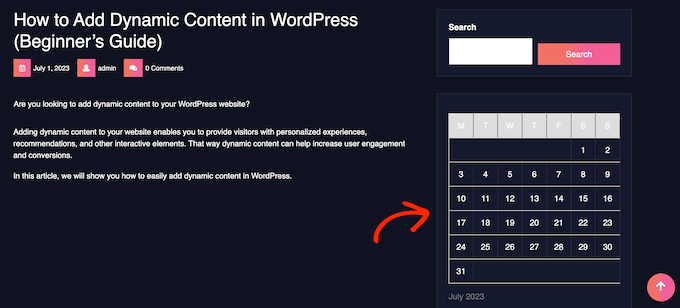
To create more custom sidebars, simply keep repeating these steps.
If your theme doesn’t support sidebars, then you can still create different sidebars using a drag and drop page builder plugin.
SeedProd is the best landing page builder plugin for WordPress. With this plugin, you can create any type of custom page without writing any code. It also has dozens of professional site kits and templates that you can easily edit and fine-tune using the drag-and-drop builder.
When designing a custom page, you can choose a layout that has a sidebar.
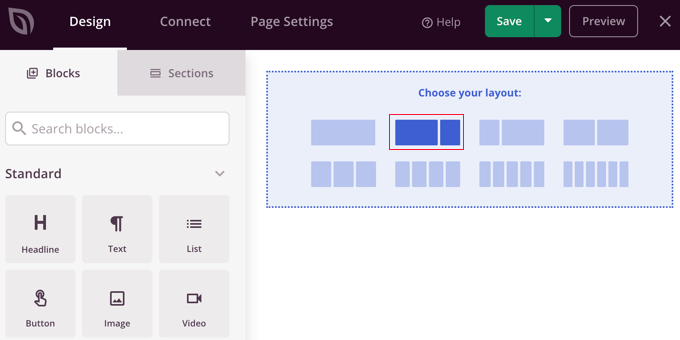
You then simply find the blocks you want to show in that sidebar and add them using drag and drop.
SeedProd has all the blocks and features you’d expect from a powerful page builder, such as optin forms, social profiles, countdown timers, contact forms, buttons, various content blocks, and more. This makes it easy to create powerful and unique sidebars for your WordPress blog.
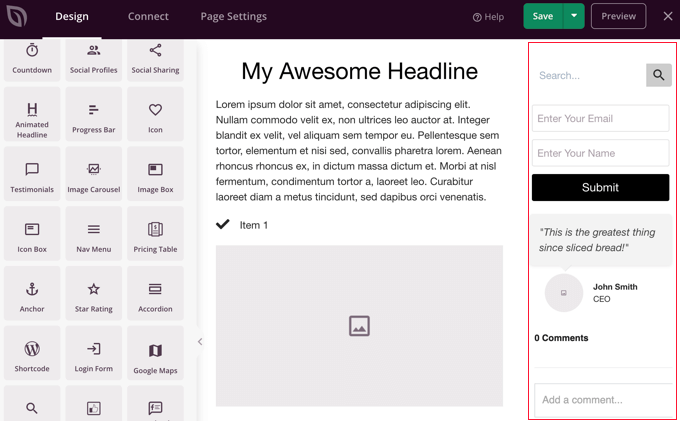
To learn how to use the SeedProd page builder plugin on your website, you can see our guide on how to create a custom page in WordPress.
We hope this article helped you learn how to add different sidebars to each post or page in WordPress. You may also want to learn how to create a custom Instagram feed in WordPress or see our expert picks for the best block themes for full site editing.
If you liked this article, then please subscribe to our YouTube Channel for WordPress video tutorials. You can also find us on Twitter and Facebook.
[ad_2]
Source link
Weglot Translate Offers Fast and Powerful Website Translation
[ad_1] The Internet has opened the doors to global opportunity
Weglot Translate Offers Fast and Powerful Website Translation
[ad_1]
The Internet has opened the doors to global opportunity for anyone with an online presence. And when it comes to breaking the language barrier to a worldwide audience, WordPress users generally have two choices.
One option is creating separate websites for each language we want to translate. The other option is to explore the offerings of translation plugins and services, such as Weglot.
Weglot Translate, a WordPress plugin and API-based translation service, promises to turn your website into a multilingual powerhouse with just a few clicks of a button.

Instead of having to deal with the expense and administrative headaches of maintaining multiple websites, it aims to provide WordPress users with an easy-to-use and feature-rich alternative for all of their website’s translation needs.
Weglot’s Main Features
Weglot Translate has a lot to offer. Here are its main features:
- Fast, simple install & setup (without any code)
- Automatic content detection and instant translation
- Content is automatically displayed under language subdirectories.
- Compatibility with all WordPress themes, plugins, and add-ons, including page builders, Yoast SEO, WooCommerce (e.g., product pages, SEO, checkout page, and more)
- Works with WordPress cache plugins for fewer database calls and faster response times
- Choose from 110+ languages
- Supports machine and human translations (including access to professional translators)
- Translations are hosted by Weglot, helping to speed up your site and avoid slowdowns due to overloaded databases.
- Tools for easy editing of translations (e.g., Translations List, Visual Editor, Glossary)
- Rule creation to include or exclude specific URLs or parts of pages for translation
- Search and Replace for easy translation of words and phrases across your site.
- Multilingual SEO-friendly, as Weglot automatically adds hreflang attributes that make it easier for search engines to index multi-language content
- Customize the appearance and placement of the language switcher button without custom code.
- Emails and PDFs translatable
- Supports RTL and LTR customization
- It supports the ability to add different images and videos for different languages.
- There is no need to bother with translation files (e.g., .po or .mo) or other WordPress source files.
- Premium features include translated URLs, multiple websites, multiple project members, and custom languages.
- Translated content is stored on dedicated and secured AWS servers.
Setting Up Weglot Translate
The Weglot plugin is easy to set up and only takes a few minutes. Here’s how to do it:

Installing Weglot
1. In WordPress, go to Plugins. Then, click ‘Add New’ and type Weglot into the Keyword search field. Alternatively, you can go directly to the plugin page.
2. Click the ‘Install Now’ button for the Weglot result, and then click ‘Activate’.
3. After the plugin is installed on your WordPress site, you’ll see a new Weglot tab in your WordPress dashboard. Click on your Weglot tab to finalize the process
Obtaining Your API key
4. In the API Key section, click the link that says Log into Weglot to get your API key. You’ll be taken to Weglot’s website.
If you haven’t already done so, you will create an account with Weglot to connect your WordPress site to the Weglot API.
5. In the Create an Account box, enter your email address and a password. Then, click the ‘Sign up’ button. Weglot will send you an email to confirm your account.
The 10-day free trial that Weglot offers here is quite limited. It allows you to translate up to 2000 words on your website into one other language. Realistically, this is only enough to accommodate websites with minimal content. However, it allows you to test the plugin and service.
Selecting Languages
6. Once you’ve confirmed your account, go back to Weglot’s Let’s Get Started page, copy the API key and paste it back into WordPress.
7. Next, select the Original Language of your site, and choose the language (or languages, if you have a premium plan) that you want to translate your site into.
8. Click the Save Changes button below.
By the way, some premium plans for Weglot include support for multiple websites. If you plan on using Weglot on multiple sites, you need to install the plugin on each site the same way you did here.
Using Weglot To Translate Your WordPress Site
Now that you’ve done the basic setup for the plugin (we’ll look at other options later), let’s run through a simple translation of your site.
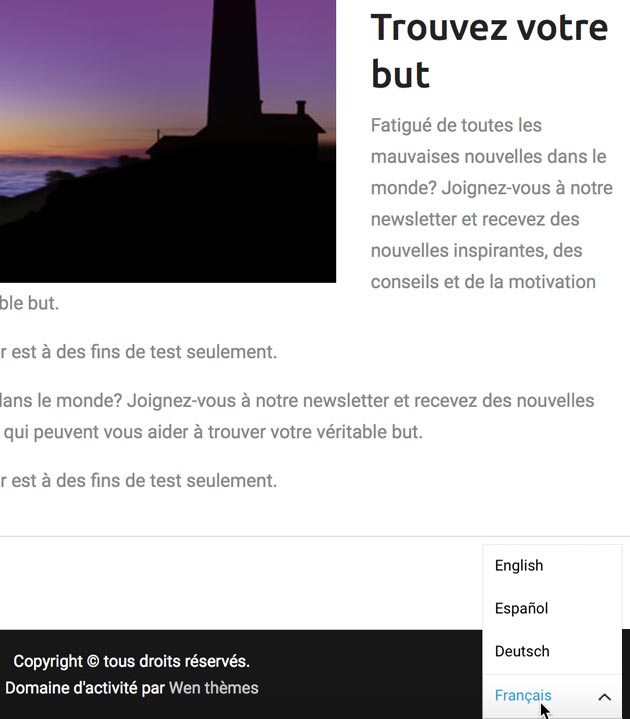
Now that Weglot has been added to your WordPress site, you’ll see a language button at the bottom right (its default position) on the front end of your website. Switch between the languages to see Weglot in action!
By default, every page on your website is translated by Weglot, but as you’ll see later, the service gives you options for choosing what’s considered for translation.
Through your Weglot Dashboard, you get complete control over your translations and can choose to make edits and manage them how you like. You can manually edit translations, order professional translators, or add team members depending on your plan.
Here’s a tip: Translating webpages results in API calls to Weglot. Because of that, using a cache plugin on your WordPress site can help reduce API calls and potentially lower the cost of their service. That’s because when you use page caching, you’ll only get charged for the API call on the initial visit that generates the cached page.
Weglot Translate Language Button
The language button allows your visitors to see your site in their desired language. With the Weglot plugin, you can easily customize its appearance and location on your website without any custom code.
To change the appearance of the language switcher, click the Weglot menu item in the WordPress sidebar and go to the Language button appearance section.

You can choose from several options for the language button’s appearance, including:
- With or without flags
- Horizontal or drop-down menus
- Display of full language name or two-letter country code
- CSS for custom displays
You can also see a preview of the button for the choices you make.
Just below the appearance settings are the settings for the language button position.

You have four options for the positioning of the language button’s location. The default button location is at the lower right position of your website’s page.
Other positioning options for the language button include:
• Navigation menu placement
For button placement in the menu, click the Weglot link in the WordPress sidebar, and then check the box next to In Menu.
• Button placement using the Weglot Translate widget
Go to Appearance… Widgets, and drag the Weglot Translate widget to your desired location.
• Shortcode
For button placement using shortcode, add [weglot_switcher] wherever you want to place the button on your posts or pages.
• Source code
You can also position the language button by adding simple code to the source code of an HTML page.
Translation Exclusion and Other Options
Below the Positioning settings are the optional Translation Exclusion settings. You can exclude URLs and HTML block elements from being translated here.

To exclude specific posts or pages, enter their relative URLs with no spaces between each entry, separated by commas, as in the example above.
To exclude specific HTML blocks from being translated, enter their CSS selector with no spaces between each entry, separated by commas.
Visitor Language Redirection
The Other Options section below the Translation Exclusion options, including Auto Redirect. With this option turned on, your visitors will see translated pages that are based on their browser language.
All of the premium Weglot plans come with Visitor Language Redirection. This is a great feature for improving the user experience of your visitors.
Visitors whose language is not supported on your site will be redirected to your website’s original language.
SEO Friendly
Weglot Translate follows Google’s best practices for multilingual sites and is SEO compatible for proper detection and indexation by search engines.
Weglot’s SEO features include:
- • Unique URLs for translated pages, with subdirectories for each language version (i.e., websitename.com/es for Spanish)
- The automatic addition of Hreflang tags in the page source code tells Google you have different language versions of your pages.
- SEO tag translation, including meta titles and meta descriptions
- Content translations in source code
- Translation of the image ALT attribute
The Weglot Dashboard
Weglot provides amazingly fast and impressive machine translation with the assistance of neural and statistical algorithms.
However, even with the state of today’s language technology, machine translations can’t be expected to surpass human translation. The people behind Weglot understand that, and that’s why they provide different tools and services to help you further edit and manage your translations.
To access the Weglot dashboard for your account, you need to select the Weglot menu in the WordPress sidebar and then click on the red Edit my translations button. If requested, log in with your email and password.
The first page you enter on the Weglot dashboard is the Home page.

From the top menu bar on the dashboard, you can (from left to right):
Switch between projects and create new projects (each source website is considered a project and uses one API key)
- View notifications
- Get support (including a knowledge base and FAQ).
- Check out your account settings, get billing information, and logout.
The Home page shows key information about your project(s), including:
- Your current Weglot plan (you can change plans here)
- The number of translated words that you’ve used for your plan
- The percentage of translation requests you’ve made
- The number of users in your workspace
- A list of recent activities you’ve made with your Weglot account, like adding languages to a website, creating a project, and changing your plan
When you click on a project on the dashboard, you’ll see links to several sections, such as:
- Languages
- URLs
- Visual Editor
- Translation Exclusions
- URL Slugs
- Glossary
- Professional Translations
and many more.
We’ll take a brief look at these sections now.
Languages
In this section, you’ll see a list of language pairs you’ve chosen to translate your website, the total translated words, and the percentage of manually translated words. You can also view your inactive translations and add new languages to make your website available in. If you have pre-existing translations, you can import them by going to Actions > Import.
Here, you can access all translations per language pair and edit and manage them accordingly.
URLs
You can also manage the translations of your URLs through your dashboard. There’s also the option to mass-select all the URLs and sync the content, order professional translations, or even export the content of them.
Visual Editor
The Visual Editor of the Weglot Dashboard lets you edit your translations directly on the front end of your site’s pages. That means you can edit your translations in a live preview of your website, allowing you to see the context of each sentence.
You can use the Visual Editor in either your original language or one of your translated languages.
To begin using the editor, click on Projects. Navigate to the Visual Editor link on the left side and click the Start Editing button.
You’ll be taken to your website’s homepage.
To edit, click the pencil icon that appears to the left of the content you wish to change. A pop-up will appear, allowing you to choose among the languages you used to translate your site. You make your changes in this pop-up window. When you’re satisfied with the changes, click OK.
There are two ways to navigate the Visual Editor. You can move around as you normally would within any website, like clicking on navigation links and then editing accordingly. Another option is to input a specific URL into the bar on the upper left of the Editor.
You could even toggle the SEO view of the Editor, which will show you the different meta descriptions and the existing translations.
Translation Exclusions
The Translation Tools section of the dashboard allows you to set rules for including or excluding the translation of different parts of your site content.
This is divided into two sections: Excluded URLs and Excluded Blocks.
There are several options here when customizing the rules for your excluded URL. You can even hide the language button on these URLs through this setting or delete translations linked to specified URLs.
You could add blocks to exclude from Weglot’s automatic translation if needed.
URL Slugs
Weglot also gives you the option to manage the translations for your URL slugs. To make things easier, you can auto-translate each one, then edit them as you see fit. To organize the slugs better, you can toggle “Hide not translated slugs” under the “Filter” dropdown menu.
Glossary
Through the Glossary, you can see an overview of the translation rules you’ve approved and set in place. It consolidates the rules implemented across all languages, making it incredibly useful for fine-tuning your localization efforts and ensuring consistency throughout your website.
It will specify whether the rules are case-sensitive and to what languages they apply. You can add new rules directly from this page by clicking “Add glossary rule”.
Similarly, if you want to import existing rules onto the Weglot plugin, click on the Actions drop-down menu > Import.
Professional Translations
The subtleties of language often require a human touch. With that in mind, Weglot allows you to order translations for pages and text strings from professional agencies from within your user dashboard.
Pricing for professional translation starts at €0.13/word, depending on the language pair. Weglot estimates 24-48 hours for professional translations. Once finished, they are automatically added to your Weglot Dashboard and website.
To order professional translation services, go to Languages on the left side of your dashboard (under the Projects view). Select your language pair, then tick the box next to the text strings you’d like to translate. Then, click the basket icon on the lower right to add them to your cart.
Fill in the right information, then proceed to payment. It’s that easy!
Support & Documentation
Weglot is easy to set up and use, and you may not need much documentation in order to get up and running with it. Still, if you need a little guidance on setting up some things, Weglot’s Help Center is full of incredibly useful documentation. These include onboarding documentation to get you going.
Weglot offers the following support and documentation:
Weglot currently supports 110+ languages for translation. If you need a language that’s not yet supported, don’t hesitate to email their support team for more assistance.
When I contacted their support with questions for this review, they responded quickly and courteously.
At the time of this writing, the free Weglot plugin from WordPress.org has an average rating of 4.8/5, 50,000+ active installs, and over 1400 five-star ratings.
Pricing
Weglot comes in both free and premium versions, with the main pricing criteria based on the total number of translated words and the number of languages you need.
The free version of the plugin won’t be enough for most websites. But if you have minimal content, such as a simple one-page or basic static site, it may do the job. You can try their service with a 10-day free trial, with no required credit card.
Premium plans include features like unlimited languages, visitor language redirection, subdirectories, multiple sites, team members, and dedicated support. Purchase of premium plans comes with a 15-day refund policy.
Weglot plan prices are listed in euros and dollars, and you can pay with other currencies. For your convenience, you can find a currency converter here.
Here’s how the different plans break down (yearly plans give you two months free):
Free
2000 translatable words (sitewide)
1 extra language
2,000 translation requests
Visitor language redirection
Basic support
Starter Plan (€150 yearly or €15 monthly)
10,000 words sitewide
1 extra language
20,000 monthly translation requests
Access to pro translators
Visitor language redirection
Premium support
Business Plan (€290 yearly or €29 monthly)
50,000 words sitewide
3 translated languages
50,000 monthly translation requests
Access to pro translators
Visitor language redirection
Pro Plan (€790 yearly or €79 monthly)
200,000 words sitewide
5 translated languages
200,000 monthly translation request
Access to pro translators
Visitor language redirection
3 projects (websites)
5 team members
Translated URLs
Page view statistics
Premium support
Advanced Plan (€2,990 yearly or €299 monthly)
1,000,000 words
10 translated languages
1,000,000 monthly translation requests
10 projects (websites)
Statistics (translation requests and page views)
Translated URLs
Custom languages
Export and import
Top-level domain
+++ and more
Extended Plan (€6,990 yearly or €699 monthly)
5,000,000 words
20 translated languages
5,000,000 monthly translation requests
20 projects (websites)
Statistics (translation requests and page views)
Translated URLs
Custom languages
Export and import
Top-level domain
+++ and more
Weglot also offers Enterprise plans with tailored support, a dedicated contract, and more. You can inquire about the price on request here.
According to Weglot, translations are no longer displayed on your site if you cancel their service. Users will thus lose all access to their translations.
Conclusions & Recommendations
The Internet provides us with a global marketplace. Yet, most of us never seriously consider the opportunities beyond our borders.
As WordPress users, we basically have two options for making our websites multilingual: create a dedicated site for each language or give a translation plugin/service a try.
The latter option is generally less expensive, less time-consuming, and much easier from an administrative and maintenance standpoint. And that’s where Weglot comes in.
Weglot is a very impressive WordPress plugin and SaaS for quickly and easily translating your website’s content into 110+ languages.
Machine-based neural and statistical algorithms automatically translate your website content (including menus, SEO, metadata, widgets, comments, and source code). The plugin also allows you to easily select content that you wish to be ignored for translation. It even automatically detects and translates new content.
With just a few clicks of a button, you can create localized websites and speak to a global audience.
But that’s just the first layer of its translation capabilities. It also provides human translation editing tools and professional translators for handling your most critical pages (e.g., sales and landing pages).
It essentially provides a complete website translation service that can scale to your needs.
Weglot isn’t cheap. But if you’re an individual or organization that can truly benefit through multilingual expansion, it’s likely that it will more than pay for itself over the long run.
If you’re looking to increase your traffic and improve your conversions by communicating with a more global audience, Weglot Translate may be your answer. To find out more, you can visit their website here.
[ad_2]
Source link
Contact Me

Adetunji Tiamiyu
Freelance Web and App DeveloperI am currently open to new projects. If you have an idea you’d like to bring to life or an ongoing project that needs improvement or fixes, I’d be happy to discuss how I can help.
Phone: +234 815 535 6235 Email: me@tialuxetech.com


